The main objective of this post is to provide detailed configuration steps on how to set up SAML Authentication for SharePoint 2013/2016 web application.
Active Directory Federation Service is a platform that can enable applications to enable single-sign-on using an authentication method known as claims-based authentication. Claim-based authentication is an industry standard for authentication which is supported by a majority of software vendors like, Microsoft, Oracle, SAP, IBM etc.
This guideline will describe on how to authenticate SAML-based claims with SharePoint by configuring the Active Directory Federation Services (ADFS). This guideline consists of the following parts:
a)ADFS Configuration
b)SharePoint Configuration
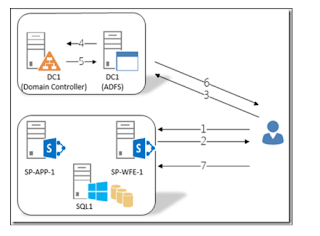
ADFS Authentication Flow :
The following diagram shows the authentication flow from partner users to CONTOSO application
ADFS Steps : ( to be done in ADFS)
1. Create Relying Party in ADFS ( ADFS Management Console > Relying party Trusts > Right click on it)
2.Provide the data manually and choose respective ADFS Profile.( in the next screen)
3. Enable support for the WS-Federation Passive protocol and enter the name of the web application URL and add /_trust/ to the end of the URL.
4. Mention name of the relying party trust identifier as urn:sharepoint:contoso
5. Create Claim Rules for the relying party created.
6. Export the token signing certificate and import the same into SharePoint Server.
SharePoint Steps : ( to be done in ADFS )
1.
|
Register Root Certificate on ADFS
|
Run below commands
$root= New-Object System.Security.Cryptography.X509Certificates.X509Certificate2("<path to signing cert>")
New-SPTrustedRootAuthority -Name "Token Signing Cert(<<name>>)" -Certificate $root
|
2.
|
Register the ADFS STS Provider
|
Run below commands
$signInUrl = "https://<<adfsservername>>/adfs/ls"
$siterealm = "urn:sharepoint:contoso"
$tokenIdentityProviderName = "<<adfsservername>>"
$TrustedIdentityTokenIssuerDescription = "SAML Provider for SharePoint on ADFS"
$adfscert = New-Object System.Security.Cryptography.X509Certificates.X509Certificate2("<path to adfs signing cert>")
$ap = New-SPTrustedIdentityTokenIssuer -Name $tokenIdentityProviderName -Description $TrustedIdentityTokenIssuerDescription -realm $siteRealm -ImportTrustCertificate $adfsCert -SignInUrl $signInUrl -UseDefaultConfiguration -IdentifierClaimIs EMAIL
|
3.
|
Convert the Application
|
Run Below Command
$wa = Get-SPWebApplication -Identity https://contoso.sharepoint.com
$tp= Get-SPTrustedIdentityTokenIssuer "<<adfsservername>>"
Convert-SPWebApplication -Identity $wa -TO CLAIMS-TRUSTED-DEFAULT -FROM CLAIMS-WINDOWS -TrustedProvider $tp -RetainPermssion -Force -Sourceskiplist <path to csv file>
|
4
|
Optional (in Case of issue)
|
Run the below command if you get “the issuer of the token is not a trusted issuer error in event viewer of SharePoint
$rootcert = New-Object System.Security.Cryptography.X509Certificates.X509Certificate2("<path to adfs signing cert>")
Set-SPTrustedIdentityTokenIssuer -Identity <<adfsservername>> -ImportTrustCertificate $rootcert
New-SPTrustedRootAuthority -Name "adfssigningroot(SIGNING_ROOT)" -Certificate $rootcert
|
Other Post configuration Steps :
INSTALL LDAPCP
|
Add-SPSolution –LiteralPath <path>
Install-SPSolution –Identity “ldapcp.wcp” –GACDeployment
|
Associate the LDAPCP with the Trusted Claims Provider by running the following command:
|
Get-SPTrustedIdentityTokenIssuer|select name
$ap = Get-SPTrustedIdentityTokenIssuer “<<adfsservername>>”
$ap.ClaimProviderName = “LDAPCP”
$ap.Update()
|
Adding Multiple web applications to trusted provider
|
Add-PSSnapin "Microsoft.SharePoint.PowerShell" -ErrorAction SilentlyContinue
$TrustedIdentifyProvider = Get-SPTrustedIdentityTokenIssuer "<<adfsservername>>"
$uri = New-Object System.Uri("https://contoso1.sharepoint.com/")
$TrustedIdentifyProvider.ProviderRealms.Add($uri, "urn:sharepoint:crescent")
$TrustedIdentifyProvider.Update()
|
When to USE LDAPCP :
After configuration of ADFS, by default people picker cannot solve the external users so if you need to resolve external users you need to configure LDAPCP and create a rule in LDAPCP section.
Configure SharePoint 2013 to trust ADFS as an identity provider
For external users, edit the claims mapping by going to SharePoint Central Administration, navigate to Security -> LDAPCP Configuration -> Claims mapping. Go to mail LDAP Attribute, and type user: under Prefix to bypass lookup. Click Save.
For groups, edit the claims mapping by going to SharePoint Central Administration, navigate to Security -> LDAPCP Configuration -> Claims mapping. Go to role LDAP Attribute, and type group: under Prefix to bypass lookup. Tick on Show claims name in display text check box. Click Save.
WHEN TO USE "CONVERT SP WEB APPLICATION" AND "MOVE SPUSER" commands :
Move-SPUser -Identity $user -NewAlias "i:0#.W|Domain\ram" -IgnoreSid ( if you need to do for multiple users you need to have PowerShell script )
Use MOVE SP User if you are configuring LDAPCP because CONVERT SPWEB Application does not work with LDAPCP.
Please note when you use move sp user you need to make all content databases read-only expect the ones that you are converting, after completion you need to switch back to read write.


Nice post...
ReplyDeleteWe are providing the best master data services around the world....visit our site for more information....
Security & Compliance
Master Data Management
Inventory Analysis
SAP Master Data Governance
data management services
master data management in sap
mdom
Hi Ram,
ReplyDeleteGreat post., after converting web application still we can configure ldapcp for external domain users?
I try move-spuser for one account it updated farm level. If I delete user profile and do full crawl then can I retain old windows account? Let me know
Thanks