Tuesday, January 1, 2019

SharePoint 2013 - ADFS - Configuration

The main objective of this post is to provide detailed configuration steps on how to set up SAML Authentication for SharePoint 2013/2016 web application.

Active Directory Federation Service is a platform that can enable applications to enable single-sign-on using an authentication method known as claims-based authentication. Claim-based authentication is an industry standard for authentication which is supported by a majority of software vendors like, Microsoft, Oracle, SAP, IBM etc.

This guideline will describe on how to authenticate SAML-based claims with SharePoint by configuring the Active Directory Federation Services (ADFS). This guideline consists of the following parts:

a)ADFS Configuration

b)SharePoint Configuration

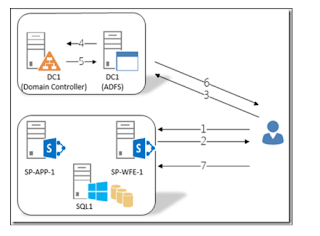
ADFS Authentication Flow :

The following diagram shows the authentication flow from partner users to CONTOSO application


ADFS Steps : ( to be done in ADFS)

1. Create Relying Party in ADFS ( ADFS Management Console > Relying  party Trusts > Right click on it)

2.Provide the data manually and choose respective ADFS Profile.( in the next screen)

3. Enable support for the WS-Federation Passive protocol and enter the name of the web application URL and add /_trust/ to the end of the URL.

4. Mention name of the relying party trust identifier as urn:sharepoint:contoso

5. Create Claim Rules for the relying party created.

6. Export the token signing certificate and import the same into SharePoint Server.

SharePoint Steps : ( to be done in ADFS )

1.
Register Root Certificate on ADFS
Run below commands

$root= New-Object System.Security.Cryptography.X509Certificates.X509Certificate2("<path to signing cert>")
New-SPTrustedRootAuthority -Name "Token Signing Cert(<<name>>)" -Certificate $root


2.
Register the ADFS STS Provider
Run below commands


$siterealm = "urn:sharepoint:contoso"
$tokenIdentityProviderName = "<<adfsservername>>"
$TrustedIdentityTokenIssuerDescription = "SAML Provider for SharePoint on ADFS"
$adfscert = New-Object System.Security.Cryptography.X509Certificates.X509Certificate2("<path to adfs signing cert>")
$ap = New-SPTrustedIdentityTokenIssuer -Name $tokenIdentityProviderName -Description $TrustedIdentityTokenIssuerDescription -realm $siteRealm -ImportTrustCertificate $adfsCert -SignInUrl $signInUrl -UseDefaultConfiguration -IdentifierClaimIs EMAIL


3.
Convert the Application
Run Below Command

$wa = Get-SPWebApplication -Identity https://contoso.sharepoint.com
$tp= Get-SPTrustedIdentityTokenIssuer "<<adfsservername>>"

Convert-SPWebApplication -Identity $wa -TO CLAIMS-TRUSTED-DEFAULT -FROM CLAIMS-WINDOWS -TrustedProvider $tp -RetainPermssion -Force -Sourceskiplist <path to csv file>
4
Optional (in Case of issue)
Run the below command if you get “the issuer of the token is not a trusted issuer error in event viewer of SharePoint

$rootcert = New-Object System.Security.Cryptography.X509Certificates.X509Certificate2("<path to adfs signing cert>")
Set-SPTrustedIdentityTokenIssuer  -Identity <<adfsservername>> -ImportTrustCertificate $rootcert
New-SPTrustedRootAuthority -Name "adfssigningroot(SIGNING_ROOT)" -Certificate $rootcert

Other Post configuration Steps :


INSTALL LDAPCP
Add-SPSolution –LiteralPath <path>
Install-SPSolution –Identity “ldapcp.wcp” –GACDeployment
Associate the LDAPCP with the Trusted Claims Provider by running the following command:
Get-SPTrustedIdentityTokenIssuer|select name

$ap = Get-SPTrustedIdentityTokenIssuer “<<adfsservername>>”

$ap.ClaimProviderName = “LDAPCP”

$ap.Update()
Adding Multiple web applications to trusted provider
Add-PSSnapin "Microsoft.SharePoint.PowerShell" -ErrorAction SilentlyContinue

$TrustedIdentifyProvider = Get-SPTrustedIdentityTokenIssuer "<<adfsservername>>"

$uri = New-Object System.Uri("https://contoso1.sharepoint.com/")

$TrustedIdentifyProvider.ProviderRealms.Add($uri, "urn:sharepoint:crescent")

$TrustedIdentifyProvider.Update()


When to USE LDAPCP :

After configuration of ADFS, by default people picker cannot solve the external users so if you need to resolve external users you need to configure LDAPCP and create a rule in LDAPCP section.

Configure SharePoint 2013 to trust ADFS as an identity provider

For external users, edit the claims mapping by going to SharePoint Central Administration, navigate to Security -> LDAPCP Configuration -> Claims mapping. Go to mail LDAP Attribute, and type user: under Prefix to bypass lookup. Click Save.

 For groups, edit the claims mapping by going to SharePoint Central Administration, navigate to Security -> LDAPCP Configuration -> Claims mapping. Go to role LDAP Attribute, and type group: under Prefix to bypass lookup. Tick on Show claims name in display text check box. Click Save


WHEN TO USE "CONVERT SP WEB APPLICATION" AND "MOVE SPUSER" commands :

Move-SPUser -Identity $user -NewAlias "i:0#.W|Domain\ram" -IgnoreSid ( if you need to do for multiple users you need to have PowerShell script )

Use MOVE SP User if you are configuring LDAPCP because CONVERT SPWEB Application does not work with LDAPCP.

Please note when you use move sp user you need to make all content databases read-only expect the ones that you are converting, after completion you need to switch back to read write.


Tuesday, June 13, 2017

Tables in SharePoint Content Database

Below are some of the basic tables within a content database and a very high level diagram on some of the relationships between them

Features
Table that holds information about all the activated features for each site collection or site.
Sites
Table that holds information about all the site collections for this content database.
Webs
Table that holds information about all the specific sites (webs) in each site collection.
UserInfo
Table that holds information about all the users for each site collection.
Groups
Table that holds information about all the SharePoint groups in each site collection.
Roles
Table that holds information about all the SharePoint roles (permission levels) for each site.
All Lists
Table that holds information about lists for each site.
GroupMembership
Table that holds information about all the SharePoint group members.
AllUserData
Table that holds information about all the list items for each list.
AllDocs
Table that holds information about all the documents (and all list items) for each document library and list.
RoleAssignment
Table that holds information about all the users or SharePoint groups that are assigned to roles.
Sched Subscriptions
Table that holds information about all the scheduled subscriptions (alerts) for each user.
ImmedSubscriptions
Table that holds information about all the immediate subscriptions (alerts) for each user.


If SharePoint Log is growing large – Things to consider :


If you are going to stick with Full Recovery, make sure you're doing *Transaction Log* backups, this is what empties the TLog.

Also, do not run Update Statistics or Reindex jobs from SQL Maintenance Plans against SharePoint databases. SharePoint has specific Health Analyzer rules (timer jobs) that do this activity for you.

If you're in Simple recovery mode then the log files should automatically empty whenever SQL thinks it's come to a sensible stopping point. If you're in Full recovery mode then the log files will continue to grow until a Full backup is taken. A second backup will then empty the logs out.

If you need to be in the full recovery model then run two full backups. The log files will probably not reduce in size immediately and a shrink may be required. You will then need to schedule a backup schedule to prevent the log files re-growing on you.

It is better to check backup logs regulary and it is needed to run a manual backup if it fails.

Friday, April 14, 2017

SharePoint ULS Logging PowerShell Commands

1.    In order to merge all the log files from all servers in a farm for particular time period, need to use below command
Merge-SPLogFile -StartTime '03/15/2016 00:00' -EndTime '03/16/2016 00:00' -Path c:\temp\upgrade.log -Overwrite

2.    If you want to create new log file then enter below command
New-SPLogFile

3.    If you want to enable verbose logging then enter below command
Set-LogLevel -TraceSeverity Verbose -EventSeverity Verbose


4.    If you want to merge all the log files in farm from different servers by using co relation id, then use below command
Merge-SPLogFile -Path C:\Logfile.log -Correlation <<Co Relation ID>>

5.    If you want to set to default values of logging then use the below command
Clear-SPLogLevel


Monday, December 26, 2016

User account name is changed in AD and getting access denied error in SharePoint 2010/2013

For some reasons if user account is changed in AD and it wont reflected in SharePoint direclty ,in this case users get access denied error because of id conflict issue. In this situation first we need to verify both old and new user accounts in SQL Database and User Profie services and need to confirm both the user account exists.

Once both the user accounts are exists in the database and user profile, we can migrate the permissions from old user to the new user as mentioned below :

To verify the account details in SQL : ( this should be executed in respective content database of the site collection)

select tp_ID, tp_Login, tp_Deleted from UserInfo where tp_Login = 'production\a.hamdan.ejd' or tp_Login ='production\ a.hamdan'


To migrate the permissions from old user to new user :

stsadm -o migrateuser -oldlogin production\a.hamdan.ejd -newlogin production\ a.hamdan -ignoresidhistory

Here ignore sid histroy parameter is used because it may refer for user histroy for new account while migrating the permissions which is not required.

Friday, July 15, 2016

User Profile Sync DB Rebuilding in SharePoint 2010/2013


Issue : User Profile Synchronization service is failing , because of this import and export operations are not working between AD and SharePoint.

We have gone through all the logs and finally we could find some data is corrupted in sync database through diagnostic logs , which is collected by Microsoft Support team.

We have implemented following steps to rebuild sync database and before that we have taken UPA Databases backup and farm backup.

  1 Stop the SharePoint Timer Service in the App Server running UPS.

  2 Stop User Profile Synchronization service through Central Administration.
  Central Admin >  System   Settings .Manage Services on Server > App Server > User Profile Synchronization Service        and click Stop

 3 Run the following PowerShell in SharePoint Management Shell with elevated permissions
    Get-SPDatabase | Out-File D:\Databases.txt
    Open the databases.txt file and file the ID for Sync database.

 4 Run the following PS commands to remove data in sync database 
$syncDataBase = Get-SPDatabase -Identity “GUID of Sync database”
$syncDataBase.Unprovision()
$syncDataBase.Status=’Offline’

  5 Get the reference to User Profile service, reset and provision the sync database
$ups = Get-SPServiceApplication -Name “User Profile Service”
$ups.ResetSynchronizationMachine()
$ups.ResetSynchronizationDatabase()
$syncDataBase.Provision()
 6 Verify that Farm admin account has access to sync database in SQL.

 7 Start back the SharePoint Timer Service which we stopped in step 1.

 8 Start back the User Profile Synchronization Service running in App Server. Central Admin > System Settings .Manage Services on Server > App Server> User Profile Synchronization Service and click Start. This might take 10-15 mins to start after you enter Farm admin credentials

 9 Optional IISRESET 

 10 Open the User Profile Service Application under Central Admin > Application Management > Manager Service Applications. Configure the synchronization connections and Connection Filters.

11 Rebuilding your SyncDB or recreating connection to Active Directory will mark all user profiles for deletion after first full or incremental sync. Disable MySite Cleaner Timer job to prevent user profiles from getting deleted.

12 Configure any mappings to custom property mappings

13 Run Full Synchronization, twice to sync all the users.

 Above steps resolved issue, sync is running successfully.

Tuesday, February 23, 2016

SharePoint 2013 Prerequisites - App Fabric Error


When I am trying to install SharePoint 2013, I got below error while running pre requisite tool ,


Below are the resolution steps to solve this error, here we need to install app fabric and respective KB  component through command prompt, for some reason  tool does not pick up this app fabric component.so we are doing it through cmd prompt.

1.Identify the SharePoint Path where setup is located , in my case the path is C:\Softwares\SharePoint SP1 slipstream, under this you will find many folders and files, notice the prerequisiteinstallerfiles  as shown in the below screen.


2.Download the WindowsServerAppFabricSetup_x64.exe and AppFabric1.1-RTM-KB2671763-x64-ENU.exe files and place this under the folder prerequisiteinstallerfiles

3.Then navigate to the folder C:\Softwares\SharePoint SP1 slipstream from the command prompt and run the following commands.
 
           prerequisiteinstaller.exe  /AppFabric:prerequisiteinstallerfiles\WindowsServerAppFabricSetup_x64.exe

4.after completion of above ,it will pop the pre requisites tool and it will continue to install the app fabric component , then system will reboot by itself after sometime.
 
5.After completion of reboot ,run again the pre requisites tool ,it will check if any missing components of app fabric. Then proceed to below step.

 
         prerequisiteinstaller.exe /KB2671763:prerequisiteinstallerfiles\AppFabric1.1-RTM-KB2671763-x64-ENU.exe
 

Repeat 3 and 4 steps again. With this app fabric components successfully installed.
 
Thank You.


Tuesday, February 16, 2016

Importing Profile Pictures from AD to SharePoint 2013


Below are sequential steps to import profile pictures from AD to SharePoint My Sites.

1.       Create My Site Web Application and respective site collection with mysitehost as template

2.       Then provide the create permissions for everyone under user policy under the web application settings

3.       Then create managed path for the my site web application with wildcard inclusion.

4.       Then make sure you are running UPA service under the system services.

5.       Then create user profile service application

6.       Then start the user profile sync service under the services, this account should have been part of local admin group and allow logon policy under security policies.

7.       Then create connection to AD , here you need to provide forest name and service account which should have replication directory permissions on AD.

8.       Test connection and choose the respective OU users you would like to import

9.       Then navigate to the user properties and look for “picture” property ,under the mapping section choose above connection created and choose attribute as “thumbnail photo” and click on Add.

10.   Then start full sync

11.   Execute the below command

Update-SPProfilePhotoStore -MySiteHostLocation  <<mysitewebapp URL>> -CreateThumbnailsForImportedPhotos $true

 With the above steps , we should be ready with picture in my site profiles.
and pictures will be saved in three different sizes in the location
 

Thursday, February 4, 2016

Secure Store Service Concept in SharePoint 2013


Why Secure Store Service Application in SharePoint ?

When data is stored in external source (anything other than SharePoint content database data is considered to be external ), SharePoint has to make separate request to display external data on SharePoint pages.

How this is achievable? This can be achievable with SharePoint Secure store service, it's important to understand that the username and password used to access external data stores may not be the same as the username and password used to access SharePoint.                                                                                                                                                                                                                    
When we are requesting data from external source from SharePoint, that user should be known to external data system, only then SP will be able to display the data.

The Secure Store Service is designed to create a background mapping between a group of users in SharePoint, and a single user known to the external data system

Note : Whatever the account (It is the single user account mentioned in above point ), that you have mentioned under set credentials section that should be given PSDATAACCESS on the respective external database.

Thursday, November 26, 2015

Office Web Apps 2013 Configuration – SharePoint 2013


Scenario : Configuring Single Server Office Web Apps Farm - For SharePoint Internet

 
Following are the Assumptions

 ·         SharePoint farm (sp1) and dedicated machine for Office Web Apps deployment are ready
 ·         SharePoint Site is accessible over internet through HTTPS

 This post describes only high level steps on how to setup Office web apps for internet and intranet.
 
Steps In Office web apps Server :

Make sure either you disable the firewall or open the ports 80,443 ,809 and 810 in firewall through inbound rules.

Make sure you have license for Office Web Apps  ( usually it is part of Office 2013 STANDARD license), if you have don’t license still you can configure office web apps however it is limited to view the documents.

1. Download Office Web Apps Server from the Microsoft Download Center.

2. Run Setup and walk through the steps in the wizard.

3. Make you sure also install Office Web Apps SP1 update (else you will get into issues)

Once you are done with above action items, then create office web apps farm by using power shell commands

 At this point you should have already planned who are the users and from where they are accessing/utilizing the office web apps features when logged in to SharePoint,

 
We need to specify 2 URLS in the command , one for internal users and other for external users. Since SharePoint is published to the internet we also need to publish the OWA server so that external users get authenticated by the OWA server.  Make sure both these two URLS are accessible

 
New-OfficeWebAppsFarm -InternalUrl <InternalURL> -ExternalUrl <ExternalURL> -CertificateName <CertificateName> -EditingEnabled

 Verify that the Office Web Apps Server farm was created successfully

 Go to the http://servername/hosting/discovery (intranet)
 Go to the https://<<public IP or public URL>>/hosting/discovery (external)

 If you see a (WOPI)-discovery XML file in your web browser then all is good.

 Please note : you need to get public IP and subdomain created in PUBLIC DNS and should raise request for SSL with this sub domain , these all should be in place and it will be done by network team.          

 
Steps in SharePoint Server ( no need to do this in all servers in the farm , login to any server in the farm):

 
1. Create new binding:

New-SPWOPIBinding -ServerName <WacServerName>

(<WacServerName> must be the FQDN internal URL)

2. Verify current zone:

Get-SPWOPIZone

3. Change to internal-https if it is set to http:

Set-SPWOPIZone –zone “internal-https

4. Verify https:

Get-SPWOPIZone

5. Verify functionality in a document library (Not using the system account, appearing as sharepoint\system)

 Click on the ‘Three dots’ after a documents name and see if you get a preview, if you do, its all good!

6. Done

Tuesday, October 13, 2015

Search Storage in SharePoint 2013


Search generates different kind of data while crawling , Following are the types of data

        1).Crawl data - is from where the index is built - this is stored on the SQL server. - The Crawl database stores the state of the crawled data and the crawl history.
 
       For SQL server sizing we only need to care about the crawl data.

* For  10 million items - 15GB DB, 2GB log

* For 100 million items - 110GB, 50GB log

currently we have one crawl database ,it can store up to 20 M items.

2) Link DB - The Link database stores the information that is extracted by the content processing component and the click through information.

* For 10 million items - 10GB DB, 0.1GB log

* For 100 million items - 100GB, 5GB log

3) Index - is where the search results are queried from - this is stored on the SharePoint servers.

       Default Index Location is : C:\Program Files\Microsoft Office Servers\15.0\Data\Office Server\Applications


SharePoint 2013 - ADFS - Configuration

The main objective of this post is to provide detailed configuration steps on how to set up SAML Authentication for SharePoint 2013/2016 w...