Thursday, November 26, 2015

Office Web Apps 2013 Configuration – SharePoint 2013


Scenario : Configuring Single Server Office Web Apps Farm - For SharePoint Internet

 
Following are the Assumptions

 ·         SharePoint farm (sp1) and dedicated machine for Office Web Apps deployment are ready
 ·         SharePoint Site is accessible over internet through HTTPS

 This post describes only high level steps on how to setup Office web apps for internet and intranet.
 
Steps In Office web apps Server :

Make sure either you disable the firewall or open the ports 80,443 ,809 and 810 in firewall through inbound rules.

Make sure you have license for Office Web Apps  ( usually it is part of Office 2013 STANDARD license), if you have don’t license still you can configure office web apps however it is limited to view the documents.

1. Download Office Web Apps Server from the Microsoft Download Center.

2. Run Setup and walk through the steps in the wizard.

3. Make you sure also install Office Web Apps SP1 update (else you will get into issues)

Once you are done with above action items, then create office web apps farm by using power shell commands

 At this point you should have already planned who are the users and from where they are accessing/utilizing the office web apps features when logged in to SharePoint,

 
We need to specify 2 URLS in the command , one for internal users and other for external users. Since SharePoint is published to the internet we also need to publish the OWA server so that external users get authenticated by the OWA server.  Make sure both these two URLS are accessible

 
New-OfficeWebAppsFarm -InternalUrl <InternalURL> -ExternalUrl <ExternalURL> -CertificateName <CertificateName> -EditingEnabled

 Verify that the Office Web Apps Server farm was created successfully

 Go to the http://servername/hosting/discovery (intranet)
 Go to the https://<<public IP or public URL>>/hosting/discovery (external)

 If you see a (WOPI)-discovery XML file in your web browser then all is good.

 Please note : you need to get public IP and subdomain created in PUBLIC DNS and should raise request for SSL with this sub domain , these all should be in place and it will be done by network team.          

 
Steps in SharePoint Server ( no need to do this in all servers in the farm , login to any server in the farm):

 
1. Create new binding:

New-SPWOPIBinding -ServerName <WacServerName>

(<WacServerName> must be the FQDN internal URL)

2. Verify current zone:

Get-SPWOPIZone

3. Change to internal-https if it is set to http:

Set-SPWOPIZone –zone “internal-https

4. Verify https:

Get-SPWOPIZone

5. Verify functionality in a document library (Not using the system account, appearing as sharepoint\system)

 Click on the ‘Three dots’ after a documents name and see if you get a preview, if you do, its all good!

6. Done

Tuesday, October 13, 2015

Search Storage in SharePoint 2013


Search generates different kind of data while crawling , Following are the types of data

        1).Crawl data - is from where the index is built - this is stored on the SQL server. - The Crawl database stores the state of the crawled data and the crawl history.
 
       For SQL server sizing we only need to care about the crawl data.

* For  10 million items - 15GB DB, 2GB log

* For 100 million items - 110GB, 50GB log

currently we have one crawl database ,it can store up to 20 M items.

2) Link DB - The Link database stores the information that is extracted by the content processing component and the click through information.

* For 10 million items - 10GB DB, 0.1GB log

* For 100 million items - 100GB, 5GB log

3) Index - is where the search results are queried from - this is stored on the SharePoint servers.

       Default Index Location is : C:\Program Files\Microsoft Office Servers\15.0\Data\Office Server\Applications


Wednesday, July 8, 2015

IRM Limitations in SharePoint 2013 On premises.


PDF document cannot be in IRM enabled libraries in ADOBE Reader, to make it work we have to rely on third party readers like foxit,nithyo
 
Excel Sheets we cannot open in the browser if these sheets are stored in the SP library where IRM is enabled.
 
We don’t have direct control over IRM permissions in SharePoint 2013,  according to SP permissions given for user on library IRM permissions will work. Means IRM is relied on SP for permissions.   
 
These are true to my investigation from Microsoft Forums and TechNet Articles.

Apps configuration in SharePoint 2013


Apps Configuration high level steps and points to consider while setting up Apps in SharePoint 2013 on premises.
  1. Create forward lookup zone in the DNS server
  2. Create alias on this zone , provide the wildcard as *  and provide FQDN for target host as SharePoint Server.
  3. Configure subscription service by using PowerShell
  4. Configure apps service by using PowerShell
In SP CA :
In the Apps section in central admin, in the apps domain section, provide the domain name (zone) which you have configured in DNS
Provide any convenient prefix name  in the App Prefix like “app” and hit ok.
Point to Note :
Apps should have dedicated web application and app catalog should be created in this web application.
And that web application should not have any host headers (host names)

Tuesday, June 2, 2015

Configuring RMS in SharePoint 2013 on premises.


This post talks detailed high level steps that are to be implemented for the configuration of IRM in SharePoint 2013 on premises for both internal and external users.
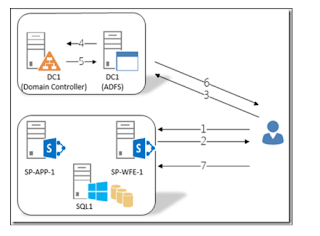
Required Servers:

1)      SharePoint Server : We have to make changes in the Central Admin under security section with RMS Server name so that SP Server talks to the RMS server

2)      RMS Server:  This is place where core RMS role will be installed and other configuration changes we need to do.

3)      Reverse Proxy Server:  In order to authenticate external users RMS server has to authenticate them so we need to have published internet server , in this case we are taking fresh new server and where we setup reverse proxy. More details in the following sections.

Following are the things need to be in place before configuration:

·         SSL Certificate for the reverse proxy server and host name which will be published in Internet by   mapping with the public IP and SSL will be configured and implemented with this same host name.

·         Note all the server names and IPS and also note the public IP which we are going to do natting with the   reverse proxy server.

·         Also get the respective service account provisioned for the RMS Server to manage and need to specify the same during RMS cluster configuration.


Configuring RMS Server :

Here I am not posting screenshots, just mentioning what needs to be taken care.

1)      Install the AD RMS Server role from server manager and install the required features. After installation of the same ,right click the ADRMS console at the top and right click and click on Add cluster, provide RMS Service account credentials in the place of service account details.

2)      After above step, you will get cluster name and right click on it and choose properties,

In properties you find following different tabs ,each has it is own functionality,

 
Cluster URLs:

It will have 2 sections, intranet and extranet, we have to specify the URLS in this two sections.

 These URLS are used by clients who connects to AD RMS server for licensing and certification purpose.

 In the intranet URL section, we need to specify the FQDN Name of the RMS Server.

In the extranet URL section, need to specify the host name configured in the reverse proxy server ( details in the following sections), which has been exposed to internet and configured reverse proxy so that requests will be routed to RMS Server from reverse proxy server.

 Proxy Settings:

This cluster server uses the proxy server to access external network in our case external server is reverse proxy server where proxy rule is configured so that whoever hits rms server from external will be authenticated by reverse proxy server and requests are sent back to the RMS Server.

 
Configuring Reverse Proxy Server:

 Following are the configuration need to be done before we set up reverse proxy.
 
1)      Local Server IP should be mapped or natting has to be done with the public IP of the reverse proxy server.

2)      Install IIS server, host name to be mapped with the public IP by doing URL publishing.

3)      DNS entry has to be created locally and also in extranet (URL Publishing) with host name.

4)      SSL certificate should be ready with the host name mapping done, during creation of SSL certificate.

     After above things ready,


·         Install URL Rewrite module for IIS with the help of Web Platform Installer and Also install Application Request Routing (ARR) for IIS with the help of Web Platform Installer

·         Open Internet Information Services (IIS) Manager and navigate to Sites → Default Web Site and select URL Rewrite from IIS features.

·         Right click in the Inbound Rules Section and click Add Rule(s)…  

·         Select Reverse Proxy under Inbound and Outbound Rules section

·         Provide the details of the server to be redirected to and click OK

·         Now you can see the Rewrite rule added to the Inbound Rules section.

·         Now we need to specify this HOST NAME url in the RMS Server under clustered url section and under extranet url section.


In the RMS Server :

Open IIS Manager and navigate to Default Web Site. Right click on Default Web Site and click Explore.

Navigate to _wmcs → certification

Right click on the “ServerCertification.asmx” file and select Properties

Navigate to Security Tab and click on Edit

Type Everyone and click on Check Name, then click on OK.

Check Read & Execute and Read permissions under Allow and click Apply, then click OK.

 Configuration in SharePoint Server :

·         Turn on IRM service in SharePoint Central Administration  :After activating the Rights Management service, you must sign into the SharePoint Central Administration to turn on Information Rights Management (IRM).

·         Login into SharePoint Central Administration with a Farm Administrator account

·         And then finally enable IRM in SharePoint library.


With this whole configuration is done, it does not have screenshots ,please mail me if you need I will send document, my email is  ramch011@gmail.com


Thank you.


Sunday, May 17, 2015

SharePoint 2013 Licensing - On Premises


SharePoint 2013 Licensing has 2 Models :

1)      Server + CAL
2)      Server Only
Depends on the type of environment we have to choose among the 2 options.

 Intranet :
In intranet scenario we have will to go for option 1 means we have to go for Server + CAL.
 
Server à depends on how many servers running in each farm, license will be calculated according to no of instances(servers) in farm. If no of servers are 4 in the SP Farm, need to buy 4 server license.

CALà this depends no of users who are accessing the SharePoint portals , 500 are users accessing SP portal then need to buy 500 CAL.

4 servers in farm and 500 users accessing the SP services based on this we have to go for option 1 ,means you have to buy server + CAL.

 Extranet:
People whose user accounts are not of AD, users belongs to third party LDAPs, and looking for access SP Site ,in this case no CALS are required.
Server license (Option 2) permits the external users without any additional CALs.

Internet:

Intranet users who wants to access the portals from internet , in this scenario also, need to choose OPTION 1 and no CALS are required.

Thursday, May 14, 2015

Search - File Shares as Content Source in SharePoint 2013 On Premises


Few things about File Share Content Source

1.Crawled files in file share system contain metadata that can be used by the search refiners in SharePoint

2.Can use SharePoint Search refiner to filer search results based on file type or author for the file shares which is supported by default.

3.Managed properties which are available for file shares contain Author,ContentType,DisplayAuthor,FileExtension,FileType,Title,IsContainer,ContentSource,Created and so on . You can use them for filtering file share content in search results or customizing your search result display template. For filtering file share content in search results based on the folder structure, you can use "Path" managed property.

 4.When end users search the document in the search site it will be displayed according to the permissions given on the files and folders , this happens automatically.

 5.Actually core content is stored on file server itself, only metadata associated with the indexed content will be stored in SharePoint. This metadata entirely different from actual metadata services.


SharePoint 2013 - ADFS - Configuration

The main objective of this post is to provide detailed configuration steps on how to set up SAML Authentication for SharePoint 2013/2016 w...