Friday, April 14, 2017

SharePoint ULS Logging PowerShell Commands

1.    In order to merge all the log files from all servers in a farm for particular time period, need to use below command
Merge-SPLogFile -StartTime '03/15/2016 00:00' -EndTime '03/16/2016 00:00' -Path c:\temp\upgrade.log -Overwrite

2.    If you want to create new log file then enter below command
New-SPLogFile

3.    If you want to enable verbose logging then enter below command
Set-LogLevel -TraceSeverity Verbose -EventSeverity Verbose


4.    If you want to merge all the log files in farm from different servers by using co relation id, then use below command
Merge-SPLogFile -Path C:\Logfile.log -Correlation <<Co Relation ID>>

5.    If you want to set to default values of logging then use the below command
Clear-SPLogLevel


Monday, December 26, 2016

User account name is changed in AD and getting access denied error in SharePoint 2010/2013

For some reasons if user account is changed in AD and it wont reflected in SharePoint direclty ,in this case users get access denied error because of id conflict issue. In this situation first we need to verify both old and new user accounts in SQL Database and User Profie services and need to confirm both the user account exists.

Once both the user accounts are exists in the database and user profile, we can migrate the permissions from old user to the new user as mentioned below :

To verify the account details in SQL : ( this should be executed in respective content database of the site collection)

select tp_ID, tp_Login, tp_Deleted from UserInfo where tp_Login = 'production\a.hamdan.ejd' or tp_Login ='production\ a.hamdan'


To migrate the permissions from old user to new user :

stsadm -o migrateuser -oldlogin production\a.hamdan.ejd -newlogin production\ a.hamdan -ignoresidhistory

Here ignore sid histroy parameter is used because it may refer for user histroy for new account while migrating the permissions which is not required.

Friday, July 15, 2016

User Profile Sync DB Rebuilding in SharePoint 2010/2013


Issue : User Profile Synchronization service is failing , because of this import and export operations are not working between AD and SharePoint.

We have gone through all the logs and finally we could find some data is corrupted in sync database through diagnostic logs , which is collected by Microsoft Support team.

We have implemented following steps to rebuild sync database and before that we have taken UPA Databases backup and farm backup.

  1 Stop the SharePoint Timer Service in the App Server running UPS.

  2 Stop User Profile Synchronization service through Central Administration.
  Central Admin >  System   Settings .Manage Services on Server > App Server > User Profile Synchronization Service        and click Stop

 3 Run the following PowerShell in SharePoint Management Shell with elevated permissions
    Get-SPDatabase | Out-File D:\Databases.txt
    Open the databases.txt file and file the ID for Sync database.

 4 Run the following PS commands to remove data in sync database 
$syncDataBase = Get-SPDatabase -Identity “GUID of Sync database”
$syncDataBase.Unprovision()
$syncDataBase.Status=’Offline’

  5 Get the reference to User Profile service, reset and provision the sync database
$ups = Get-SPServiceApplication -Name “User Profile Service”
$ups.ResetSynchronizationMachine()
$ups.ResetSynchronizationDatabase()
$syncDataBase.Provision()
 6 Verify that Farm admin account has access to sync database in SQL.

 7 Start back the SharePoint Timer Service which we stopped in step 1.

 8 Start back the User Profile Synchronization Service running in App Server. Central Admin > System Settings .Manage Services on Server > App Server> User Profile Synchronization Service and click Start. This might take 10-15 mins to start after you enter Farm admin credentials

 9 Optional IISRESET 

 10 Open the User Profile Service Application under Central Admin > Application Management > Manager Service Applications. Configure the synchronization connections and Connection Filters.

11 Rebuilding your SyncDB or recreating connection to Active Directory will mark all user profiles for deletion after first full or incremental sync. Disable MySite Cleaner Timer job to prevent user profiles from getting deleted.

12 Configure any mappings to custom property mappings

13 Run Full Synchronization, twice to sync all the users.

 Above steps resolved issue, sync is running successfully.

Tuesday, February 23, 2016

SharePoint 2013 Prerequisites - App Fabric Error


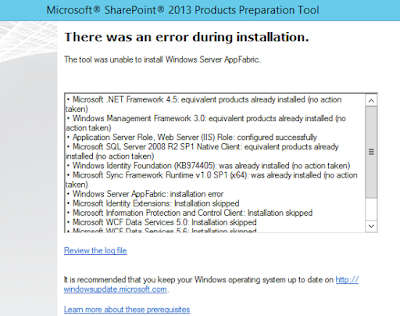
When I am trying to install SharePoint 2013, I got below error while running pre requisite tool ,


Below are the resolution steps to solve this error, here we need to install app fabric and respective KB  component through command prompt, for some reason  tool does not pick up this app fabric component.so we are doing it through cmd prompt.

1.Identify the SharePoint Path where setup is located , in my case the path is C:\Softwares\SharePoint SP1 slipstream, under this you will find many folders and files, notice the prerequisiteinstallerfiles  as shown in the below screen.


2.Download the WindowsServerAppFabricSetup_x64.exe and AppFabric1.1-RTM-KB2671763-x64-ENU.exe files and place this under the folder prerequisiteinstallerfiles

3.Then navigate to the folder C:\Softwares\SharePoint SP1 slipstream from the command prompt and run the following commands.
 
           prerequisiteinstaller.exe  /AppFabric:prerequisiteinstallerfiles\WindowsServerAppFabricSetup_x64.exe

4.after completion of above ,it will pop the pre requisites tool and it will continue to install the app fabric component , then system will reboot by itself after sometime.
 
5.After completion of reboot ,run again the pre requisites tool ,it will check if any missing components of app fabric. Then proceed to below step.

 
         prerequisiteinstaller.exe /KB2671763:prerequisiteinstallerfiles\AppFabric1.1-RTM-KB2671763-x64-ENU.exe
 

Repeat 3 and 4 steps again. With this app fabric components successfully installed.
 
Thank You.


Tuesday, February 16, 2016

Importing Profile Pictures from AD to SharePoint 2013


Below are sequential steps to import profile pictures from AD to SharePoint My Sites.

1.       Create My Site Web Application and respective site collection with mysitehost as template

2.       Then provide the create permissions for everyone under user policy under the web application settings

3.       Then create managed path for the my site web application with wildcard inclusion.

4.       Then make sure you are running UPA service under the system services.

5.       Then create user profile service application

6.       Then start the user profile sync service under the services, this account should have been part of local admin group and allow logon policy under security policies.

7.       Then create connection to AD , here you need to provide forest name and service account which should have replication directory permissions on AD.

8.       Test connection and choose the respective OU users you would like to import

9.       Then navigate to the user properties and look for “picture” property ,under the mapping section choose above connection created and choose attribute as “thumbnail photo” and click on Add.

10.   Then start full sync

11.   Execute the below command

Update-SPProfilePhotoStore -MySiteHostLocation  <<mysitewebapp URL>> -CreateThumbnailsForImportedPhotos $true

 With the above steps , we should be ready with picture in my site profiles.
and pictures will be saved in three different sizes in the location
 

Thursday, February 4, 2016

Secure Store Service Concept in SharePoint 2013


Why Secure Store Service Application in SharePoint ?

When data is stored in external source (anything other than SharePoint content database data is considered to be external ), SharePoint has to make separate request to display external data on SharePoint pages.

How this is achievable? This can be achievable with SharePoint Secure store service, it's important to understand that the username and password used to access external data stores may not be the same as the username and password used to access SharePoint.                                                                                                                                                                                                                    
When we are requesting data from external source from SharePoint, that user should be known to external data system, only then SP will be able to display the data.

The Secure Store Service is designed to create a background mapping between a group of users in SharePoint, and a single user known to the external data system

Note : Whatever the account (It is the single user account mentioned in above point ), that you have mentioned under set credentials section that should be given PSDATAACCESS on the respective external database.

Thursday, November 26, 2015

Office Web Apps 2013 Configuration – SharePoint 2013


Scenario : Configuring Single Server Office Web Apps Farm - For SharePoint Internet

 
Following are the Assumptions

 ·         SharePoint farm (sp1) and dedicated machine for Office Web Apps deployment are ready
 ·         SharePoint Site is accessible over internet through HTTPS

 This post describes only high level steps on how to setup Office web apps for internet and intranet.
 
Steps In Office web apps Server :

Make sure either you disable the firewall or open the ports 80,443 ,809 and 810 in firewall through inbound rules.

Make sure you have license for Office Web Apps  ( usually it is part of Office 2013 STANDARD license), if you have don’t license still you can configure office web apps however it is limited to view the documents.

1. Download Office Web Apps Server from the Microsoft Download Center.

2. Run Setup and walk through the steps in the wizard.

3. Make you sure also install Office Web Apps SP1 update (else you will get into issues)

Once you are done with above action items, then create office web apps farm by using power shell commands

 At this point you should have already planned who are the users and from where they are accessing/utilizing the office web apps features when logged in to SharePoint,

 
We need to specify 2 URLS in the command , one for internal users and other for external users. Since SharePoint is published to the internet we also need to publish the OWA server so that external users get authenticated by the OWA server.  Make sure both these two URLS are accessible

 
New-OfficeWebAppsFarm -InternalUrl <InternalURL> -ExternalUrl <ExternalURL> -CertificateName <CertificateName> -EditingEnabled

 Verify that the Office Web Apps Server farm was created successfully

 Go to the http://servername/hosting/discovery (intranet)
 Go to the https://<<public IP or public URL>>/hosting/discovery (external)

 If you see a (WOPI)-discovery XML file in your web browser then all is good.

 Please note : you need to get public IP and subdomain created in PUBLIC DNS and should raise request for SSL with this sub domain , these all should be in place and it will be done by network team.          

 
Steps in SharePoint Server ( no need to do this in all servers in the farm , login to any server in the farm):

 
1. Create new binding:

New-SPWOPIBinding -ServerName <WacServerName>

(<WacServerName> must be the FQDN internal URL)

2. Verify current zone:

Get-SPWOPIZone

3. Change to internal-https if it is set to http:

Set-SPWOPIZone –zone “internal-https

4. Verify https:

Get-SPWOPIZone

5. Verify functionality in a document library (Not using the system account, appearing as sharepoint\system)

 Click on the ‘Three dots’ after a documents name and see if you get a preview, if you do, its all good!

6. Done

Tuesday, October 13, 2015

Search Storage in SharePoint 2013


Search generates different kind of data while crawling , Following are the types of data

        1).Crawl data - is from where the index is built - this is stored on the SQL server. - The Crawl database stores the state of the crawled data and the crawl history.
 
       For SQL server sizing we only need to care about the crawl data.

* For  10 million items - 15GB DB, 2GB log

* For 100 million items - 110GB, 50GB log

currently we have one crawl database ,it can store up to 20 M items.

2) Link DB - The Link database stores the information that is extracted by the content processing component and the click through information.

* For 10 million items - 10GB DB, 0.1GB log

* For 100 million items - 100GB, 5GB log

3) Index - is where the search results are queried from - this is stored on the SharePoint servers.

       Default Index Location is : C:\Program Files\Microsoft Office Servers\15.0\Data\Office Server\Applications


Wednesday, July 8, 2015

IRM Limitations in SharePoint 2013 On premises.


PDF document cannot be in IRM enabled libraries in ADOBE Reader, to make it work we have to rely on third party readers like foxit,nithyo
 
Excel Sheets we cannot open in the browser if these sheets are stored in the SP library where IRM is enabled.
 
We don’t have direct control over IRM permissions in SharePoint 2013,  according to SP permissions given for user on library IRM permissions will work. Means IRM is relied on SP for permissions.   
 
These are true to my investigation from Microsoft Forums and TechNet Articles.

Apps configuration in SharePoint 2013


Apps Configuration high level steps and points to consider while setting up Apps in SharePoint 2013 on premises.
  1. Create forward lookup zone in the DNS server
  2. Create alias on this zone , provide the wildcard as *  and provide FQDN for target host as SharePoint Server.
  3. Configure subscription service by using PowerShell
  4. Configure apps service by using PowerShell
In SP CA :
In the Apps section in central admin, in the apps domain section, provide the domain name (zone) which you have configured in DNS
Provide any convenient prefix name  in the App Prefix like “app” and hit ok.
Point to Note :
Apps should have dedicated web application and app catalog should be created in this web application.
And that web application should not have any host headers (host names)

Tuesday, June 2, 2015

Configuring RMS in SharePoint 2013 on premises.


This post talks detailed high level steps that are to be implemented for the configuration of IRM in SharePoint 2013 on premises for both internal and external users.

Required Servers:

1)      SharePoint Server : We have to make changes in the Central Admin under security section with RMS Server name so that SP Server talks to the RMS server

2)      RMS Server:  This is place where core RMS role will be installed and other configuration changes we need to do.

3)      Reverse Proxy Server:  In order to authenticate external users RMS server has to authenticate them so we need to have published internet server , in this case we are taking fresh new server and where we setup reverse proxy. More details in the following sections.

Following are the things need to be in place before configuration:

·         SSL Certificate for the reverse proxy server and host name which will be published in Internet by   mapping with the public IP and SSL will be configured and implemented with this same host name.

·         Note all the server names and IPS and also note the public IP which we are going to do natting with the   reverse proxy server.

·         Also get the respective service account provisioned for the RMS Server to manage and need to specify the same during RMS cluster configuration.


Configuring RMS Server :

Here I am not posting screenshots, just mentioning what needs to be taken care.

1)      Install the AD RMS Server role from server manager and install the required features. After installation of the same ,right click the ADRMS console at the top and right click and click on Add cluster, provide RMS Service account credentials in the place of service account details.

2)      After above step, you will get cluster name and right click on it and choose properties,

In properties you find following different tabs ,each has it is own functionality,

 
Cluster URLs:

It will have 2 sections, intranet and extranet, we have to specify the URLS in this two sections.

 These URLS are used by clients who connects to AD RMS server for licensing and certification purpose.

 In the intranet URL section, we need to specify the FQDN Name of the RMS Server.

In the extranet URL section, need to specify the host name configured in the reverse proxy server ( details in the following sections), which has been exposed to internet and configured reverse proxy so that requests will be routed to RMS Server from reverse proxy server.

 Proxy Settings:

This cluster server uses the proxy server to access external network in our case external server is reverse proxy server where proxy rule is configured so that whoever hits rms server from external will be authenticated by reverse proxy server and requests are sent back to the RMS Server.

 
Configuring Reverse Proxy Server:

 Following are the configuration need to be done before we set up reverse proxy.
 
1)      Local Server IP should be mapped or natting has to be done with the public IP of the reverse proxy server.

2)      Install IIS server, host name to be mapped with the public IP by doing URL publishing.

3)      DNS entry has to be created locally and also in extranet (URL Publishing) with host name.

4)      SSL certificate should be ready with the host name mapping done, during creation of SSL certificate.

     After above things ready,


·         Install URL Rewrite module for IIS with the help of Web Platform Installer and Also install Application Request Routing (ARR) for IIS with the help of Web Platform Installer

·         Open Internet Information Services (IIS) Manager and navigate to Sites → Default Web Site and select URL Rewrite from IIS features.

·         Right click in the Inbound Rules Section and click Add Rule(s)…  

·         Select Reverse Proxy under Inbound and Outbound Rules section

·         Provide the details of the server to be redirected to and click OK

·         Now you can see the Rewrite rule added to the Inbound Rules section.

·         Now we need to specify this HOST NAME url in the RMS Server under clustered url section and under extranet url section.


In the RMS Server :

Open IIS Manager and navigate to Default Web Site. Right click on Default Web Site and click Explore.

Navigate to _wmcs → certification

Right click on the “ServerCertification.asmx” file and select Properties

Navigate to Security Tab and click on Edit

Type Everyone and click on Check Name, then click on OK.

Check Read & Execute and Read permissions under Allow and click Apply, then click OK.

 Configuration in SharePoint Server :

·         Turn on IRM service in SharePoint Central Administration  :After activating the Rights Management service, you must sign into the SharePoint Central Administration to turn on Information Rights Management (IRM).

·         Login into SharePoint Central Administration with a Farm Administrator account

·         And then finally enable IRM in SharePoint library.


With this whole configuration is done, it does not have screenshots ,please mail me if you need I will send document, my email is  ramch011@gmail.com


Thank you.


SharePoint 2013 - ADFS - Configuration

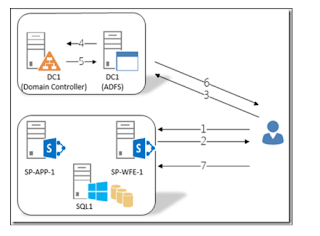
The main objective of this post is to provide detailed configuration steps on how to set up SAML Authentication for SharePoint 2013/2016 w...